
Canon printers can easily scan a paper or picture once you understand how to go about it. Such devices are usually quite user-friendly, and their scanning qualities are good as well. In case you want to become familiar with your printer or streamline the scanning process for you, we have everything laid out step by step, and you’ll surely make the best of it using your Canon printer.
Why Use a Canon Printer for Scanning?
Canon has been quite well known for providing high-quality printers for home as well as the office. High-technology scanners from Canon assure very clear, noise-free printing reproductions of documents or photographs. A Canon printer is definitely good for a wide range of use such as personal printing needs, office use, and so on for a creative endeavor. This means the buyer will find his money invested in a very efficient piece of technology which will never leave him unsatisfied.
Step-by-Step Guide
Let’s get started with the step-by-step process.
Step 1: Prepare Your Printer
Make sure the Canon printer has been setup right. So get on to following steps prior scanning
- Step check: The power switch must be active. And this includes turning off the main shut off on both sides to your power and confirm all connections as it’s going be checked during testing too.
- Connect the printer to the computer or a network. A USB cable may be used or a wireless network. The connectivity procedure is well explained in your printer’s user guide. Your printer needs to maintain a stable connection to your computer during scanning operations.
- Install Drivers and Other Software: Install the latest versions of drivers, including Canon’s scanning software from the official website, such as IJ Scan Utility. Ensure that your installed drivers are current and up-to-date for optimal operation with your computer’s operating system.
- Check Printer Hardware: Clean the scanner bed so that it does not have dust or smudges to get a high-quality scan. If your scanner bed is dirty, streaks or imperfections can happen in your scanned images or documents.
Step 2: Position the Document
Carefully place your document or photograph on the scanner bed for the best output:
- Open your Canon printer scanner lid. Leave it open, don’t let it fall.
- Face the document face down on the glass, keeping it straight as possible, parallel to the orientation guides indicated in the scanner, to make it properly aligned in scanning. To scan with an appropriate level of precision, you have to make sure to position the documents right.
- Scan lightly close the cover of the scanner so that there is no jerking of a document. Slightly avoid it so that neither the scanner can be damaged neither the document does.
Step 3: Choose Scanning Settings
Select correct scanning settings appropriately to get scanned results. These are as below:
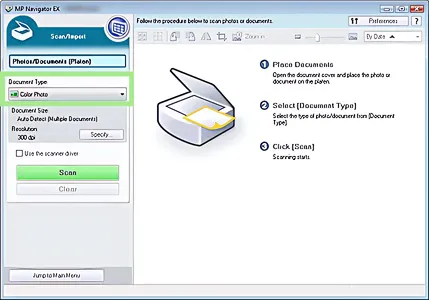
- Open Canon IJ Scan Utility or equivalent scanning software in your computer. The application has an easy user interface so it is easy to choose your options.
- Choose what type of scan you need
- Document Scan : Good for scanning any text document for printing or emailing.
- Photo Scan : Scans high resolution photographs, which allows the colours to be retained, and even ensures that every small detail of a photograph remains there.
- Custom Scan: You will be able to change the resolution, color mode, and file type to suit your needs.
- Specify the destination folder where the scanned file will be saved. Choosing an organized folder structure ensures easy retrieval of your scanned files later.
Step 4: Start Scanning
Once your settings are configured, proceed with the scanning process:
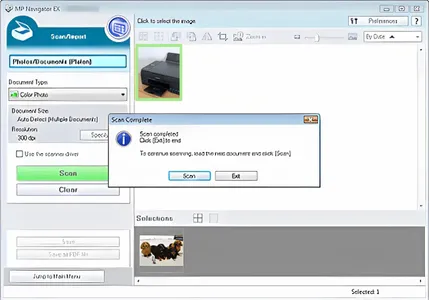
- Now you start scanning your software, a scan as simple as clicking the “Scan” button. This will flash the percentage value to show how long the scan will take on your computer screen.
- Wait until the scanning is done. The scanning may take from few seconds to several minutes depending on the resolution and the size of the document. Higher the resolution takes longer period but quality is better.
- Preview the captured image after scanning and ensure it appears to look like what you expected. Adjust your settings if you do not like the result and scan again. This will help ascertain the level of misalignments or quality problems at an earlier stage.
Step 5: Save and Share the Scanned File
Then follow up with this procedure to download it and share the same with the others based upon the satisfaction of the content which you scanned.
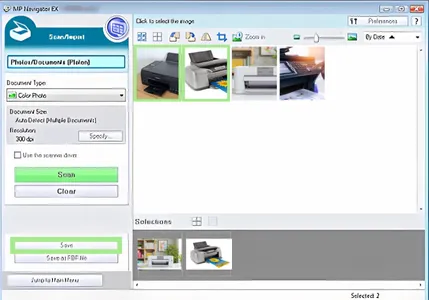
- Click on your preferred type “Export” button- PDF, JPEG, PNG-by which the file is being saved on the computer device, PDF suits to documents, and JPEG images.
- Rename the downloaded file if it is not named simply for easy easy identification. Remember, the descriptive filename makes you spot the document quicker when you intend to use.
- Share the file either through email or upload it in cloud storage so that you have access. In fact, most cloud services offer editing and collaboration work with the scanned files also.
Benefits of Scanning with a Canon Printer
Canon printers are popular for their sophisticated features and reliability. Here are some key advantages:
- It scans and prints at the highest resolution so that your documentation or creative projects are very sharp and clear. That is ideal in preserving important documents or fond memories.
- Easy Interface: The user interface of scanning software and the controls of a printer are straightforward, even to a first-timer. Anyone can easily complete complex tasks step by step using easy-to-use menus.
- From photographs to multipage documents, Canon offers very simple conversion for all your tasks. Such capabilities make the printers suitable for a wider range of uses – either at home or in a business context.
Need Assistance? Choose Print Web Technology
While Canon is most noted to produce highly reliable devices sometimes troubles creep in. However rest assured for assistance in case a scanner breaks down or similar complaints as regards printer malfunctions as service is always accessible through Print Web Technology for the very best of printer repair services regardless of whether being faced with a problem of email login issues from having been linked in through printer scanning software through competent engineers at Print Web Technology. Their professional services guarantee that your computer printer repair needs are met promptly, reducing the downtime and regaining functionality as soon as possible. Print Web Technology, being committed to quality and customer satisfaction, is a trusted partner in all your needs related to printing.
Common Scanning Issues and Troubleshooting
1. Scanner Not Detected
- Ensure that the printer is correctly connected to your computer. All cables should be checked and the wireless connection confirmed to be stable.
- Restart the printer and computer to clear any temporary faults. Minor connectivity issues are often resolved with such a simple step.
- Reinstall the printer driver. The latest version will keep it in sync with the latest software and prevent software conflicts with the scanner.
2. Poor Scan Quality
- Scanner Glass: Clean the glass with a lint-free cloth and mild cleaning solution, ensuring a streak free and smear free scanning of an image.
- Increase the resolution settings in the scanning software for sharper and more detailed scans. Higher resolutions become particularly important for texts with smaller characters or detailed designs.
- Inspect Printer Hardware Problems, like a misaligned lid or worn-out parts. This will save time in the long run, if proper maintenance is done regularly.
3. Scanning Software Errors
- Update to the newest version of your scanning software. Updates of software typically bring corrections and performance improvements.
- Ensure no other applications are conflicting with the software. Close unnecessary programs to free up system resources.
Advanced Scanning Features
Canon printers also offer advanced scanning features to enhance your experience:
- Batch Scanning: Scan multiple pages into a single file, making it convenient for handling large documents.
- OCR (Optical Character Recognition): Convert scanned documents into editable text, saving time on manual data entry.
- Cloud Integration: Upload the scanned files to the cloud storage from Google Drive or Dropbox for easy access and sharing.
Tips for Better Scanning Results
- Use the Right Resolution: Depending upon the document type, set resolution appropriately. Photos will require a much higher resolution than text document will need just the minimum. This will allow it to be scanned at the optimal quality without using too much file size.
- Ensure Bright Lighting: Do not scan in a dimly lit environment because shadows can distort the image. Bright and even lighting minimizes distortion and enhances clarity.
- Update Your Printer: Regularly update your printer’s firmware and software for optimal performance. Updating ensures compatibility with the latest devices and applications.
Conclusion
Learning how to scan with a Canon printer is a valuable skill that simplifies document management. By using this guide, you can scan and save the files easily. However, in case of any technical problem, then Print Web Technology is here to assist you with computer printer repairing services and other related fields. They ensure that your printer is always in good working condition, which would save you extra time for what really matters. With Canon’s advanced features and Print Web Technology’s reliable support, you can now have a smooth scanning experience that covers all your needs.
Now that you are all armed with all this knowledge, it is time to put it into action and get the best out of your Canon printer’s scanning capabilities!
Pingback: How to Insert Ink Cartridge in a Canon Printer - Print Web Technology